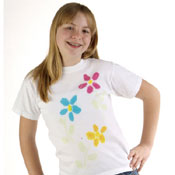
Use tie-dye to create this colorful flower T-shirt with simple painting. This tie-dye painting project from I Love to Create is a fun activity to do with kids.
Materials:
- Tulip® One-Step Tie-Dye Kits™
- Classic
 Colors
- Classic
- Garbage bag
- Foam plate
- Paper towels
- Cardboard
- T-shirt, white
- Masking tape
- Plastic wrap
- 1” flat paintbrush
- Scratch paper
- Black felt pen
Instructions:
- Wash shirt to remove sizing. Do not use fabric softener in the washer or dryer.
- Cover work surface with garbage bag.
- Using black felt pen, freehand flower pattern on scratch paper, flipping over for a reverse pattern for one flower.
- Place shirt on work surface and smooth flat. Cover pattern with plastic wrap, taping excess to back. Insert pattern into shirt and position in place. Pattern will show through shirt.
- Wearing gloves from kit, fill each dye bottle with water. Shake until thoroughly mixed.
- Squeeze a small amount of Fuchsia Dye on foam plate. Wet and dry brush with paper towel. Dip brush in Dye then press into center of flower. Dye will spread on fibers. Paint dye to about ¼” from edge and let spread to line. If more dye is needed, add paint at center again and let spread. Clean brush and plate.
- Squeeze a small amount of Yellow Dye on plate and mix with Fuchsia to create an orange color. Fill in petals of lower flower with this mixture. Clean brush and plate.
- Add Turquoise to plate and fill in petals. Add Yellow centers to each flower then Lime stems and leaves.
- Cover with plastic wrap or garbage bag. Let set 4-6 hours. Fill washer to large load setting with a small amount of laundry soap. Dry in dryer.
Read more at http://www.favecrafts.com/Crafting-with-Kids/Flower-Tie-Dye-Shirt-from-Tulip#FqIKr607ZpOZ5gzX.99
No comments:
Post a Comment