Monday, July 7, 2014

Pooh & Friends Paper Bag Puppets By Miranda Becker

Pooh and his pals from the Hundred Acre Wood find fun wherever they go. Craft your very own Pooh, Piglet, and Tigger puppets from colorful paper bags and cardstock. Put on a puppet show and create your own adventures for this silly old bear.
You'll need:
  • Character templates
  • 3 paper bags (red, orange, pink)
  • Cardstock (golden yellow, dark pink, light pink, black, orange, cream)
  • Scissors
  • Glue stick
  • Black marker
Instructions:
1. Print the templates and cut out the pieces.
For Tigger:
2. Trace Tigger's template pieces onto the color cardstock specified. Cut out the pieces.
3. Lay an orange paper bag on a flat surface with the bottom flap facing up. Glue the jaw just under the flap.
4. Glue Tigger's head to the bottom flap.
5. Now glue the cream-colored snout and eye-patch onto Tigger's head. Glue the pink nose in the center of Tigger's face, overlapping the snout and eye-patch.
6. Glue Tigger's mouth and tongue to his jaw.
7. Add details like eyes and stripes. Finally, glue on Tigger's expressive eyebrows.
For Pooh:
8. Trace Pooh's template pieces onto the color cardstock specified. Cut out the pieces.
9. Lay a red paper bag on a flat surface with the bottom flap facing up. Lift the bottom flap and glue the jaw just underneath.
10. Glue Pooh's head onto the bottom flap.
11. Glue on details like Pooh's dark red mouth, pink tongue, and black nose.
12. Add details like eyes and a mouth with a black marker.
For Piglet:
13. Trace Piglet's template pieces onto the color cardstock specified. Cut out the pieces.
14. Glue the ears to the top of Piglet's head.
16. Lay a pink paper bag on a flat surface with the bottom flap facing up. Lift the bottom flap and glue the jaw just underneath.
17. Glue Piglet's head, with ears attached, onto the bottom flap.
18. Glue on Piglet's pink snout and add details like eyes and eyebrows using a black marker.

http://family.go.com/crafts
For more fun activities follow me at
https://facebook.com/childrens.exclusives

Wednesday, July 2, 2014

DIY Take Along Game of Tic Tac Toe by MollyMooCrafts


Entertain the kids with this DIY Take along game of tic tac toe!  It is a fun kids activity  that will keep kids happy even on long road trips. 


Here is what you need to make your very own take along game of Emotional Tic Tac Toe:
  • 8 Wine Corks
  • Acrylic Paint
  • Pencil
  • Black Sharpie
  • Felt
  • Sewing thread
Start by painting the corks white to cover the graphics and leave aside to dry.
Then with a pencil lightly draw the outline of the face on each cork and use this line as a guide for painting outside with the main colors. You need to paint four corks in one color and the balance in another contrasting color – the opposition!!
When dry the kids will really enjoy adding the character to each cork, which one is happy, grumpy and confused?
Now to play you can simply have a sheet of paper and some pencils to make the tic tac toe grid or if you want something more permanent that the kids can come and go to, again and again and again, just cut a piece of craft felt into a square and sew on some quick grid lines with zig-zag stitching. Easy, even for someone who can only sew in straight lines like myself!!! I’ll get there…. eventually!! More on www.skiptomylou.com
For more fun activities visit
https://www.facebook.com/childrens.exclusives

Saturday, June 28, 2014

Fun Farm Veggies By: Paula Bales for Styrofoam Brand Foam

Make your child want to eat more veggies with these Fun Farm Veggies. If they can laugh and play with these little guys, they might want to try the real thing. This is a project for anyone looking for easy crafts for kids. Use Styrofoam and other easy-to-find craft materials to your own version of this project. Country craft ideas have never looked this tasty. Paint a cute face on your veggies to give them an extra fun look.
Materials:
  • STYROFOAM Brand Foam:
    • Cones, 6" x 3", two
    • Egg, 5", one
    • Ball, 3", one
  • Acrylic paints: orange, purple, red
  • Clay pots, one each: 2-1/2"; 3"
  • Plastic canvas yarn, 2-ply, green
  • Wiggle eyes, four each: 10mm; 15mm
  • Wooden ball knobs, 3/8", four
  • Serrated knife
  • Candle stub or paraffin
  • Fine-line black permanent marker
  • Ruler
  • Paintbrushes: round, flat
  • Disposable palette
  • Water basin
  • Paper towels
  • Scissors
  • Low-temp glue gun and glue sticks
  • Thick, white craft glue

Instructions:
Carrots
  1. Pass knife blade through candle stub. Use knife to cut foam cones into carrot shapes; carrots should be slightly different. Sand carrots with scrap piece of foam. Use paintbrush handle to indent horizontal lines in carrots; use finger to make round indentation in top of each carrot.
     
  2. Paint carrots orange, and two ball knobs red (noses).
     
  3. Glue two 10mm wiggle eyes to one carrot and two 15mm eyes to remaining carrot. Paint top third of each eye orange for eyelids; use marker to outline eyelids.
     
  4. Using photo as guide, glue noses to carrots. Using very little paint, paint cheeks red. Use marker to draw mouths and eyebrows.
     
  5. For carrot stems, glue yarn loops of various sizes together; glue stems to carrot tops.
     
  6. Glue additional yarn loops inside top of 2-1/2" clay pot. Glue carrots together, then glue carrots inside pot.
Eggplant
  1. Follow carrot instructions, except:
     
  2. Cut foam egg into eggplant shape; indent top.
     
  3. Paint eggplant purple, and one ball knob red (nose).
     
  4. Glue two 15mm eyes to eggplant. Paint eyelids purple; outline.
     
  5. For leaves, glue small yarn loops to top of eggplant. For stem, cut three 3/4" lengths from yarn. Glue lengths together, then glue to top of eggplant.
     
  6. Glue additional yarn loops, and eggplant, inside top of 3" pot.
Tomato
  1. Follow carrot instructions, except:
     
  2. Cut foam ball into tomato shape; indent top.
     
  3. Paint tomato red, and one ball knob orange (nose).
     
  4. Glue two 10mm eyes to tomato. Paint eyelids red; outline.
     
  5. Follow eggplant Step 4.


Read more at http://www.favecrafts.com   

Monday, June 16, 2014

Tie -Dye T-shirt

Use tie-dye to create this colorful flower T-shirt with simple painting. This tie-dye painting project from I Love to Create is a fun activity to do with kids. 
Flower Tie-Dye Shirt
Materials:
  • Tulip® One-Step Tie-Dye Kits™
  • Garbage bag
  • Foam plate
  • Paper towels
  • Cardboard
  • T-shirt, white
  • Masking tape
  • Plastic wrap
  • 1” flat paintbrush
  • Scratch paper
  • Black felt pen
Instructions:
  1. Wash shirt to remove sizing. Do not use fabric softener in the washer or dryer.
     
  2. Cover work surface with garbage bag.
     
  3.  Using black felt pen, freehand flower pattern on scratch paper, flipping over for a reverse pattern for one flower.
     
  4.  Place shirt on work surface and smooth flat. Cover pattern with plastic wrap, taping excess to back. Insert pattern into shirt and position in place. Pattern will show through shirt.
     
  5.  Wearing gloves from kit, fill each dye bottle with water. Shake until thoroughly mixed.
     
  6.  Squeeze a small amount of Fuchsia Dye on foam plate. Wet and dry brush with paper towel. Dip brush in Dye then press into center of flower. Dye will spread on fibers. Paint dye to about ¼” from edge and let spread to line. If more dye is needed, add paint at center again and let spread. Clean brush and plate.
     
  7.  Squeeze a small amount of Yellow Dye on plate and mix with Fuchsia to create an orange color. Fill in petals of lower flower with this mixture. Clean brush and plate.
     
  8.  Add Turquoise to plate and fill in petals. Add Yellow centers to each flower then Lime stems and leaves.
     
  9.  Cover with plastic wrap or garbage bag. Let set 4-6 hours. Fill washer to large load setting with a small amount of laundry soap. Dry in dryer.

Read more at http://www.favecrafts.com/Crafting-with-Kids/Flower-Tie-Dye-Shirt-from-Tulip#FqIKr607ZpOZ5gzX.99

Tissue Paper Night Lights

Get your kids involved in this simple night light and get them to add their own creativity .
This uses very simple everyday materials.

Go to the link to follow the steps.
http://www.kiwicrate.com/projects/Tissue-Paper-Night-Lights/621#

Thursday, June 12, 2014

Funny Quotes on the World Cup

"I'd been ill and hadn't trained for a week, and I'd been out of the team for three weeks before that, so I wasn't sharp. I got cramp before half-time as well. But I'm not one to make excuses."
– Clinton Morrison
“If I tried it 100 or a million times it couldn’t happen again. If I could, I would have carried on playing.”
– Sir Alex Ferguson on how a flying football boot hit David Beckham in the face


Tuesday, June 10, 2014

NATIONAL BLACK COW DAY


National Black Cow Day is celebrated each year on June 10.  Are you in the mood for ice cream?  We are all familiar with the “Root Beer Float” but did you know that it is also called the “Black Cow”?
A “Black Cow” was originally made with root beer and vanilla ice cream.  Today it is sometimes made with root beer and chocolate ice cream or cola and vanilla ice cream.
Frank J. Wisner of Cripple Creek, Colorado, gets the credit for inventing the “Black Cow”  way back in August of 1893.
One night, as Wisner, owner of the Cripple Creek Cow Mountain Gold Mining Company, was staring out the window and thinking about the line of soda waters that was producing for the citizens of Cripple Creek, he came upon an idea.  The full moon that night that was shining on the snow-capped Cow Mountain reminded him of a scoop of vanilla ice cream.  He hurried back to his bar and added a scoop to the children’s favorite flavor of soda, Myers Avenue Red root beer, tried it, liked it and served it the very next day.  It was an immediate hit.
Wisner named the new creation, “Black Cow Mountain” but the local children shortened the name to “Black Cow“.
Sit back, relax and enjoy a Black Cow today!

Monday, June 9, 2014

NATIONAL STRAWBERRY RHUBARB PIE DAY


June 9 of each year celebrates National Strawberry Rhubarb Pie Day.
Following are two “tried and true” recipes for you to try and to share with your family and friends. We think that you will enjoy them so much you will be making them more than once this summer!  Enjoy!!
HAVE A WONDERFUL NATIONAL STRAWBERRY RHUBARB PIE DAY!

Kids For Saving Earth Promise Song

Tuesday, June 3, 2014

LOVE CONQUERS ALL


Don't go for looks, they can deceive.
Don't go for wealth, even that fades away
Go for someone who makes you smile,
because it takes only a smile to make  a dark day seem bright.

Find the one that makes your heart smile!!

-source unknown

Wednesday, May 28, 2014

CD Rom or Margarine Lid Campfire Craft Contributed by Leanne Guenther

The margarine lid version of this craft is slightly easier than the cd rom version, but both turn out to make a cute campfire that kids can display.  Our favorite part of the craft is walking around outside collecting the twigs and pebbles.

Materials:

  • old CD rom or margarine container lid
  • small rocks
  • small sticks
  • yellow, red and/or orange tissue paper
  • glue (white school glue not a glue stick)
     

collect twigs and stonesInstructions:

  • Collect some twigs and pebbles (you can do this during a nature walk).
     
  • If using a CD Rom, make sure you ask mom or dad if it is ok.  You don't want to accidentally build your campfire on dad's old tunes!

  • cd rom with rocksPour a good amount of glue into the margarine container lid (the lip of the lid will keep the glue from running out.
     
  • If using a CD Rom, you need to be a bit more careful applying glue to each rock but still use lots.
     
  • Arrange the rocks in a circle all around the outside of the lid.

  • tissue paper
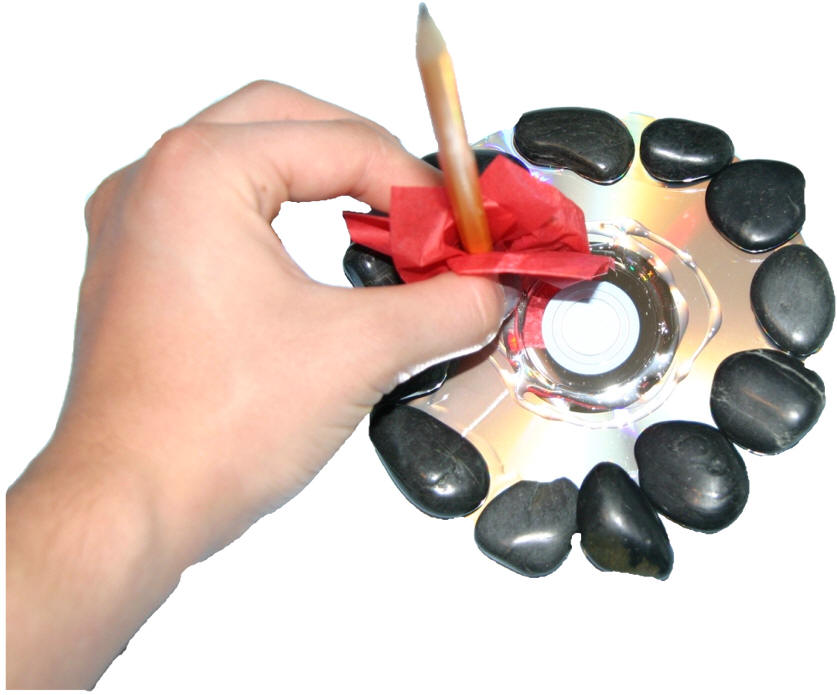
Scrunch a bit of tissue paper around the end of a pencil and place it in the center of the lid.
     
  • Lift the pencil out - this should leave a little "flame" of tissue paper on your lid.
     
  • Repeat until the center of the lid is full of flames.

  • campfire twigs
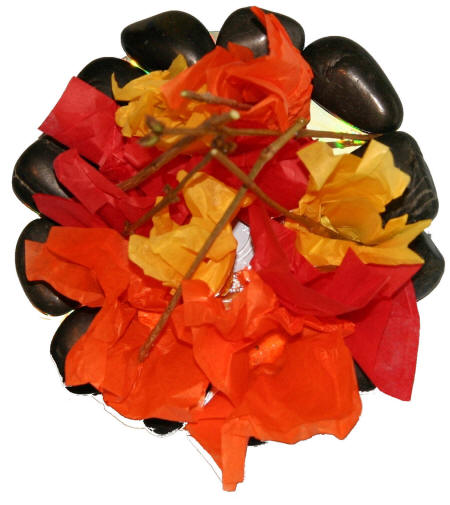
Put a little glue on each of the twigs and lay them around the tissue paper in a pyramid shape like you would laying out a fire.


Summer!!!!


Monday, May 26, 2014

USA Handprint Wreath

This hand print wreath is a good choice for memorial day, veteran's day or the 4th of July.
It works equally well as a group or family project (with each person contributing a hand print or two) or a solo craft.
 

Materials:

  • glue,
  • scissors,
  • red, white and blue paint or construction paper.
     

Instructions:

  • There are two ways to do this craft.
    • One is to trace the child's hand onto paper and cut out the prints.
    • The second is to make paint hand prints on the paper and cut those out.
       
  • Make nine hand prints (3 of each color).
     
  • Cut out the prints and glue to form a wreath.
     
  • Decorate as desired with flags or poppies from the templates provided or your own photos or drawings.
     

Sunday, May 25, 2014

Thirteen Moons on Turtle's Back

In Native American Legend, the thirteen scales on Turtle's shell stand for the 13 cycles of the moon, each with its own name and a story that relates to the changing seasons. Joseph Bruchac and Jonathan London collaborate to reveal the beauty of the natural world around us, while Thomas Locker's illustrations honor both Native American legends and the varied American landscape.
Available at  http://amzn.to/1jRGF03

Pete the Cat: A Pet for Pete

When Pete gets a goldfish, Goldie, he decides to paint a picture of his new pet. Word spreads of Pete's cool paintings, and soon everyone wants one. But Pete doesn't have enough time to make one for everyone in town. With a little help from his mom, Pete finds the perfect solution so that everyone can enjoy a Goldie painting and Pete has time to finish his homework!
At http://amzn.to/1oirRcT

Friday, May 23, 2014

Celebrate your children's birthday with these wonderful craft ideas

Crafts and Giggles offer children’s craft parties which are a fun form of party entertainment. All of the craft activities are entertaining and creative introducing a unique twist on conventional entertainment at children’s birthday parties! We devise each craft party to your requirements to make it a distinctive and exciting experience full of crafts and giggles, be it in your home or a venue of your choice.

Our children’s craft parties allow children to enjoy making something as an individual, or as a group. From cupcake decorating to fabric fun you can watch your child get creative, learn something new, and most importantly have a treasured memory of the best party ever!

See a small selection of our craft and giggles party options below! If these don’t grab you, we can develop a bespoke craft party for you!

Tuesday, May 20, 2014

Make a rainbow wind spinner

Make a rainbow wind spinner

Teach your kids about the importance of recycling by reusing some stuff from your recycling bin. This cheerful rainbow wind spinner is made out of a recycled plastic bottle and is an easy craft activity for kids.  Watch the video tutorial below to find out how to make your own!

Number of players:

1 +

What you need:

  • 1 x recycled plastic soft drink bottle (with a plastic lid)
  • 4 x rolls of electrical tape (green, blue, red, yellow)
  • 1 x small stanley knife
  • 1 x brass barrel swivel ( a fishing accessory found in the fishing section of K-mart)
  • string
  • 1 x paperclip

Activity:

Watch the video below to find out how to make a recycled bottle wind spinner.


First take the label off your recycled bottle.
Now, where the label was, you are going to make the bottle look pretty by placing stripes of electrical tape in different colors around the centre of it. About six to seven layers of tape should do it.
Next you are going to make vertical slits at 2cm in the area that is covered by the electrical tape. Measure out 2cm intervals as a guide and then use a stanley knife to make the slits. (Kids you should get Mum or Dad or an older sibling to do this.) When using a stanley knife always make sure your hand is not in the 'line of fire' -  don't put your hand in the direction you are cutting. Always cut away from your supporting hand.
Now that you have your vertical slits, push the top of the bottle down to make the strips flare out. When they do, pinch each strip across the middle to make a fold.
Next you have to angle the strips at the top and bottom so that they will catch the wind. Do this by making 45 degree folds to the right at the top and bottom of each strip.
Now get the bottle top.  You are going to make a hole in the top of it. To do this you can either:
  • heat the paper clip or a kitchen skewer so that it melts through the plastic to make the hole
  • use a small hand drill
  • hammer a nail through it
Unfold the paper clip so it's a straight piece of wire. Thread it through one eyelet of your swivel. Fold it over and twist the two ends together. Now thread them through the hole in the top of the bottle lid and fan them out so it stays in place.
Tie string to the other end.
Put the lid on the bottle.
Hang your spinner from a tree outside and watch it spin in the wind!

Winnie the Pooh and The Honey Tree- Short Children's Stories - Audio Books

Sunday, May 18, 2014

A Little Princess


Frances Hodgson Burnett (1905)
Sara has a privileged background but is now living as a Cinderella figure; and she plays at being a princess. But her response shows that being a princess is less a social ranking than a state of mind.

Good book for children to read


E B White (1952)
The New Yorker writer cherished for his elegance of style gives us an altruistic spider with exquisite manners, and a pig to make her proud. There are intimations of mortality, but a plot of fame and legacy thumbs its nose at the inevitable.

Thursday, May 15, 2014

INTERNATIONAL DAY OF FAMILIES


Secretary-General's Message for 2014

As we commemorate this year’s International Day of Families, we recognize the meaningful contributions that families make to advancing the mission of the United Nations.
By providing economic and emotional sustenance to their members, families can raise productive, caring citizens committed to the common good. Strong, well-functioning families, whatever form they may take, can help reduce poverty, improve the wellbeing of mothers, promote gender equality and uphold human rights.
Support for families is crucial to realizing their full potential.  That means factoring their needs into development policies, considering their circumstances in addressing conflicts, and advocating for the equal treatment of all families, regardless of their structure. As we strive to usher in a more sustainable future, achieve the Millennium Development Goals, shape a new development agenda and combat climate change, let us mobilize the world’s families.

On this International Day of Families, let us strive to strengthen these small but critical units found in every society so that we may advance as one human family toward greater progress.
Ban Ki-moon

Wednesday, May 14, 2014

Simple Wood Crafts

Clothespin Giraffe

This lovable giraffe can stand up all on its own thanks to sturdy clothespin legs.
Make It: Cut an oval from chipboard; paint it and three clothespins yellow. Add black paint to the tip of each clothespin as shown. Once the paint has dried, let your child use his fingertips to create brown paint spots all over the oval body and clothespin legs and neck. Clip the legs and neck onto the body and glue in place. Glue a yellow pom-pom face onto the neck and adhere a folded chenille stem along the back of the neck to complete the giraffe.


Map craft for children

Kids have all sorts of creative ideas that are just waiting for the opportunity to be expressed. Give your child the chance to explore textures, colors and shapes through fun arts and crafts for kids. Each of the simple activities for kids has a list of materials, step-by-step instructions, and a list of skills it develops, making it easy for you to select and facilitate projects. They're fun for families, so pick crafts for kids that you can do together.


  • MAP SKILLS

  • Large sheet of paper
  • Pens or markers
  • Glue
  • Paints and paintbrushes
  • Sturdy cardboard or wood, and milk cartons or small boxes (optional)

Instructions

  • Paint and decorate milk cartons or small boxes and glue them onto the map to make buildings.
  • Instead of a city map, draw a map of your yard, your house or your child's bedroom.
  • On a very large sheet of paper, draw an imaginary city map big enough for your child’s toy cars and trucks..
  • Include familiar places like the bank, grocery store, gas station, park, school, church, post office, and so on.
  • Let him color and decorate the city.
  • Tape the finished city map to the floor so your child can travel around the city with his cars, trucks, dolls, and fire engines.